The Finite Element Analysis and Gear Modelling Performed by Pranav Dhoj Shah
1.PROBLEM DEFINITION
The objective of the project is to create the model using general and advanced features of Pro/Engineer software and then analyze the stress distribution in critical part in the whole assembly using Finite Element Method-by the help of Pro/Mechanica software.
2. SOLUTION PLAN
In this project, Finite Element Analysis was used to find the stresses and displacements that occur in Gear D subjected to an axial load. For this, a computer model of the Can opener was created in Pro/Engineer, and then analyzed in a connected Finite Element program called Pro/Mechanica using the integrated Mode.


The gear teeth (green color) meshing with pinion teeth (yellow color) are the critical point for analytical consideration.
The reasons to choose the Gear D for
analysis are as followings:
· Gear D is connected to the axle that supports the can supporter and thus considerably greater constraint is imposed in the faces of slots in the gear.
· The face width of each tooth (equal to the thickness of gear plate) was 1.8mm only making it a critical part.
·
The gear profile is interesting part to carry analysis
on.
3.
PLAN EXECUTION
Calculation for the load acting on gear teeth of gear D
Given Specifications
Motor specification:
The specifications for the motor used are as following (under free lead condition):
Power: 11W
Revolution per minute: 1600
Gear Meshing:
There are total of four spur gears used to transmit power from motor to the can supporter.
The gears used are as:
Gear A (acting as pinion) integral with the motor with 8 involute teeth.
Gear B (meshing with gear A) with 60 teeth and forming compound system with gear C.
Gear C (acting as pinion) with 8 teeth.
Gear D (meshing with gear C) with 52 teeth and connected to the can supporter with an axle.
For further information and specifications for the gears used, drawings in Annexure can be referred to.
Thus the speed (in rpm) of the can supporter is given as:
RPM of the can supporter N= 1600*(8/52)*(8/60) = 32.82rpm
Calculation
Power to be transmitted P=12W
Speed of Gear D, N=(1600)*(8/52)*(8/60)
The normal WN load acting on the gear tooth can be calculated as :
WN =T/r
Where
T (Torque applied)=P*60/(2PN)
Where
P (Power to be transmitted)= 60W
R =radius of the gear
\WN = 161.33 N
Now the tangential load acting on the tooth face can be calculated as
WT =(P*Cs)/v
Cs (Service factor)=0.8 (considering steady load and intermittent use of 3 hours per day)
v (Pitch line velocity)=DP*N*/60
Where
DP (Diametral pitch of gear D)=Number of teeth/ Pitch Diameter
= 6.102212mm
Thus
v=0.068m/sec
Hence we get
WT =(11*0.8)/0.068 =129.4117N
However in reality, the dynamic tooth load applied is greater than tangential load due to these factors:
1. Inaccuracies of tooth spacing
2. Irregularities in tooth profiles
3. Deflections of teeth under load.
Thus the dynamic load is considered for analysis purpose for better accuracy of results.
By Buckingham equation, the dynamic tangential load acting on the tooth
WT= WT +á21v(b. Cs + WT)/21v+Ö(b Cs + WT)ñ
Where
b ( Tooth face width in mm)=1.8mm
\ WT = 143.93 N
The normal load is resolved into tangential load WT and radial Load WR while doing the analysis.
Thus the value of Radial load WR can be calculated from Normal load and its tangential component.
\ WR=Ö (WN2- WT 2)
=72.88 N
We know the allowable stress for gear made up of alloy steel is 450 N/mm2
The analysis will also consider whether the stress generated in the gear profile will be under the allowable stress.
Also we can calculate the allowable tangential load to be acting on the tooth profile by the equation
WT=(Allowable stress in N/mm2 )*CvbPmy
Where
Cv (Velocity factor)=3/(3+v) (Since the pitch line velocity v is less than 12.5 m/sec)
=0.9778
m (Module)= 0.76277 mm
y ( tooth form factor) =0.124 – (0.684/Number of Teeth)
=0.110846
Thus we have allowable WT (allowable) as
WT(allowable)=
163.62 N
Thus the load falls well below the allowable limit and the gear system should service satisfactorily.
4. Assumptions:
· The constraint acting on the face is considered for the time when the motor just starts rotating; in that time the starting torque acting on the tooth is maximum.
· Material is homogeneous, isotropic, linear and free of internal defects or flaws.
·
This is a linear-static-stress analysis.
5. Analyses and Procedure
Step 1 - Part Creation
The
model was created in Pro/Engineer “Proe20”, and then imported into
Pro/Mechanica.
To execute the analysis efficiently considering time and memory space of the
computer, the rounds on the holes and other teeth, expect the one upon
consideration were deleted as shown to avoid the fatal error thrown while
analysis in process.

Unit chosen for analysis:
Length: cm
Force: Newton
Time: Second
Mass: Kg
Temperature: C
Step 2 - Model Setup
Material Properties:
The gear
material was assigned as HS, low-alloy Steel with properties as followings:
Isotropic
Young’s Modulus:
1.99948e+07 N/mm2
Poisson’s
ratio : 0.27
Constraints:
The constraint acting on the model into consideration is due to the axle, which support the can supporting part. Thus at start up, the maximum constraint is applied on the inner face on the gear slot (into which the axle fits) and thus the constraints are imposed on the inner eight faces of the slot as shown:
Trans X, Trans Y, Trans Z, Rot X, Rot Y, Rot Z , all fixed.
All constraints applied were applied as Edge/Surface constraints.

Loads and constraints applied on the tooth face.
Loads:
The load acting on the tooth face is resolved into two components as shown above.
FX= 72.88 N
FY=-143.93 N
FZ=0
The load distribution is as total load and spatial variation is assumed to be uniform.
The load acts on face/surface.
Step 3 -
Defining and running the Analysis:
Both the constraint and tooth load were considered for analysis purpose and Converge method was set to Multi-pass Adaptive, using 10 % converge on LCL Disp & Lcl SE & Global RMS Stress and a maximum polynomial order of 8.
The Multi-pass Adaptive was chosen, as it is the ultimate in convergence analysis and the model was simplified to ease the analysis and increase its efficiency.
The analysis was run as standard/static one.
6. RESULTS
The results were obtained as the analysis converged after 7 passes (maximum polynomial order was set to 8). Few information obtained from the summary file are as given:
Points: 114
Edges: 445
Faces: 541
Solids: 212
Elements: 212
The total mass of the model: 1.642837e-04 kg
The mass moment of inertia about the center of mass obtained are as following:
Ixx: 1.68655e-04 m4
Ixy: 5.10710e-08 m4
Iyy: 1.63405e-04 m4
Ixz: -1.47029e-09 m4
Iyz: 1.34280e-09 m4
Izz: 3.31129e-04 m4
The resultant load on model:
In global X direction: 7.288003 e+01
In global Y direction: -1.439301e+02
In global Z direction: 3.432411e-12
The results obtained are tabulated as following:
|
Parameters |
Value |
Convergence |
|
Maximum Displacement in magnitude |
6.661512e-04 cm |
1.7% |
|
Maximum Displacement in X direction |
2.844667e-04 cm |
2.9% |
|
Maximum Displacement in Y direction |
-6.619038e-04 cm |
1.7% |
|
Maximum Displacement in Z direction |
2.151707e-05 cm |
4.4% |
|
Maximum rotation in x, y and z direction |
0.000 Degrees |
0.0% |
|
Maximum Principal Stress |
2.420461e+04 N/cm2 |
3.6% |
|
Maximum Von Misses Stress |
3.941122e+04 N/cm2 |
4.1% |
|
Maximum Stress in XX direction |
-3.087373e+04 N/cm2 |
0.0% |
|
Maximum Stress in XY direction |
2.090537e+04 N/cm2 |
4.8% |
|
Maximum Stress in XZ direction |
1.954458e+03 N/cm2 |
1.7% |
|
Maximum Stress in YY direction |
-3.036723e+04 N/cm2 |
0.6% |
|
Maximum Stress in YZ direction |
-1.619810e+03 N/cm2 |
49.2% |
|
Maximum Stress in ZZ direction |
-8.677643e+03 N/cm2 |
1.0% |
|
Minimum Principal Stress |
-4.392891e+04 N/cm2 |
3.2% |
|
Strain Energy |
4.063722e-02 Ncm |
1.8% |
The analysis was completed in duration of 750 seconds.
The following figures are derived from the results obtained from the
analysis.
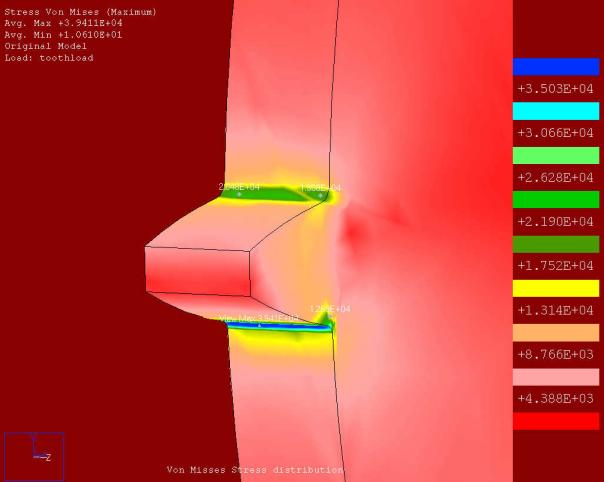
The Von Misses Stress Distribution

We
can notice the maximum on Misses stress is acting on the base of the tooth.
There are some stress concentrations generated on the corners of the central
slot.
The Von Misses Stress Distribution on tooth

The Von Misses Stress acting on the tooth
profile.
The Stress Distribution in XX and YY directions

The stresses are concentrated in tooth.
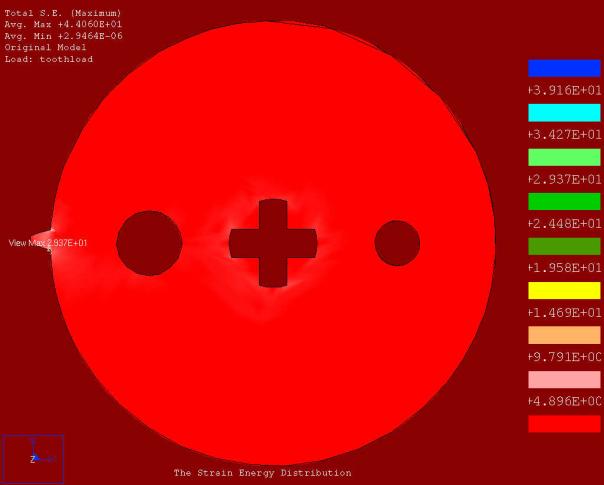
The Strain Energy Distribution

The strain energy is also maximum on the tooth base.
The displacement in magnitude

The displacement obviously maximum at
the tooth top, but the area near the constraint also experience some strain.
The Von Misses Stress Distribution in the Deformed view

The deformed views of the gear suggests, the
stress is increased near the constraint
as the deformation increases.

The convergence graph for Maximum Von
Misses Stress, Maximum Displacement and Maximum Strain Energy.

The convergence graph is within
satisfactory level.
The deformation pattern imposed in the tooth


The deformation induces increasing
stress on the constrained surfaces also.
REVIEWS AND
COMMENTS
With respect to the results obtained and shown above, following comments can be derived:
· The stress is concentrated on the tooth as it has curved and changing profile.
· The load acting on the tooth profile is in safe region as the tangential load acting on the tooth face is smaller than the allowable tangential load for the particular profile.
· The thickness of the gear plate (face width) is within safe limit of design as the tangential load acting on the tooth is below the safe limit.
·
The analysis lies in safe region due to the calculation
of dynamic tangential loading imposed due to:
-Inaccuracies of tooth spacing
-Irregularities in tooth profiles
-Deflections of teeth under load.
These factors were taken care by the value obtained from Buckingham’s Equation.
· The maximum Von misses stress acting on the base of the tooth profile (as shown) implies that area is prone to failure if excess load is applied.
· The convergence obtained for the values of strain energy, displacement etc. are satisfactory. Also the convergence of 4.1% in case of Von Misses Stress is quite satisfactory.
· There is no rotatory motion produced on the gear profile.
·
As the maximum load and stress acting on the gear tooth
are well below the allowable limit, the product can service satisfactorily
provided the power and torque provided by the motor is around the current one.
However the results and their accuracy could have been increased if:
· The convergence level in the analysis was chosen less than 10%.
· The rounds around the holes and all of the teeth were considered.
But both of the cases would have induced memory shortage for the computer to terminate the analysis (as the memory quota was limited). The project group experienced the same fatal error during the analysis due to memory shortage of the computer, when all the features were considered. So the analysis was done with simpler geometry good enough to simulate real world condition.
ANNEXURE
Acknowledgements
Black and Decker
Machine Design by
R.S. Khurmi